This guide provides a detailed walkthrough of the features and functionalities of the FFCS-Planner application F2CS-Planner For VIT-Vellore, VIT-Chennai, VIT AP. It will help you understand how to use the application to plan your academic semester effectively. GitHub
Table of Contents
Features
The FFCS-Planner is a powerful tool designed to help students at Vellore Institute of Technology (VIT) plan their courses for the semester. Here are some of the key features:
- Course & Slot Selection: Easily add your desired courses and select the lecture and lab slots that fit your schedule.
- Campus Specific Data: The planner supports multiple campuses (Vellore, Chennai, AP) and provides course data specific to your campus.
- Faculty Preferences: Specify your preferred faculty members for each course in order of priority.
- Conflict Handling: The planner automatically checks for slot clashes and denotes them with red or green based on availability in the course cards.
- Import/Export: Save your timetable plan and share it with friends. You can also import a plan to get started quickly.
- Color Customization: See your timetable come to life as you add courses. Personalize your timetable with different color palettes.
- User-Friendly Interface: A clean and intuitive interface that makes course planning a breeze.
- Persistent Sessions: Your plan is automatically saved in your browser, so you can pick up where you left off.
Getting Started
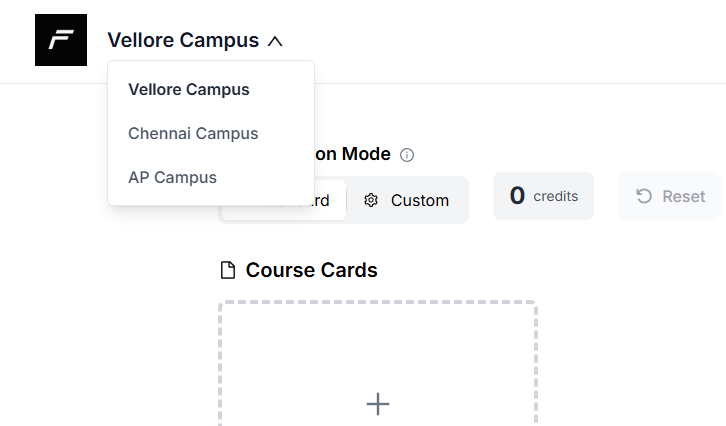
Campus Selection
- Open the application in your preferred web browser Desktop Preferred.
- Sign in using your Google Auth credentials.
- After logging in, choose your campus from the dropdown menu (e.g., Vellore, Chennai, AP).
- The application will then load the relevant data for your selected campus.
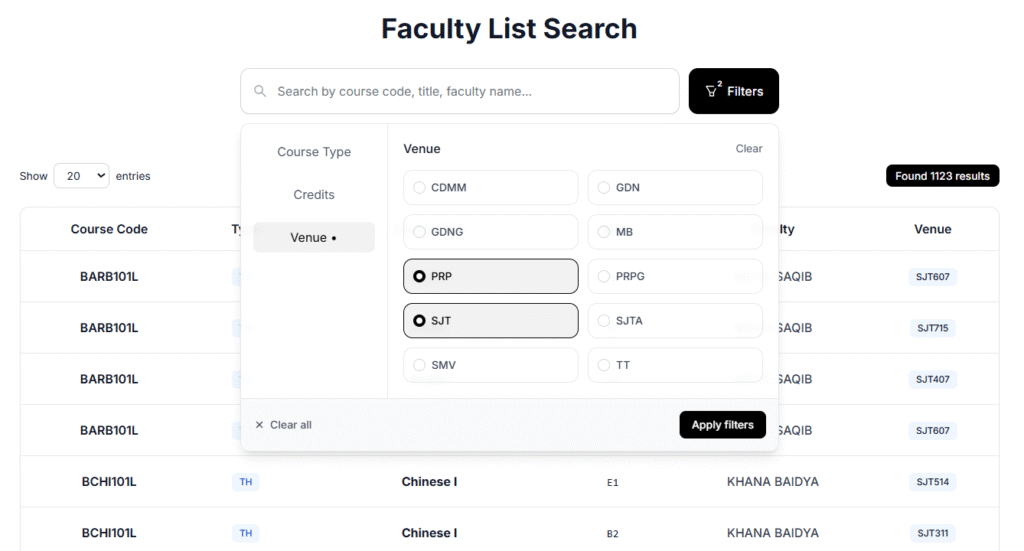
Faculty List Search
Faculty List Search is available on the top right of the navigation bar, displaying the semester name. The search bar allows you to search by (course code, title, faculty name, etc). Search results can be filtered by course type, credits, and venue. Before planning, you can review the faculty list.
Slot Selection Mode
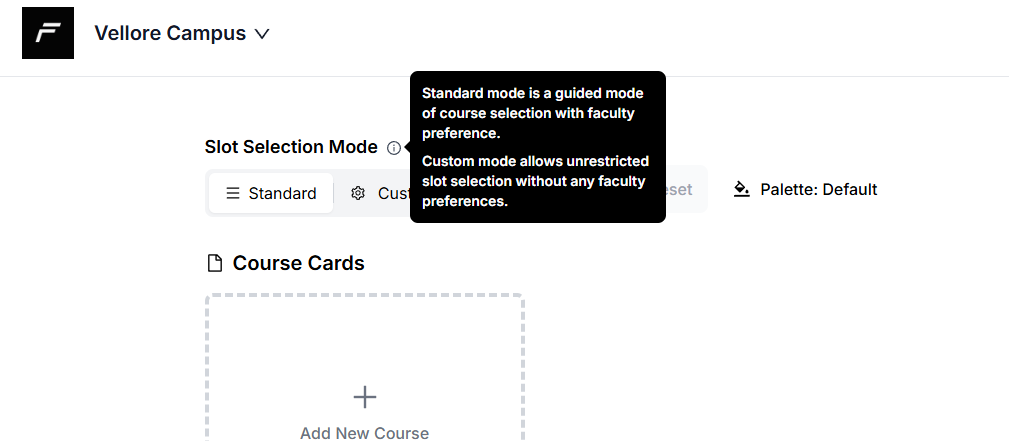
There are two modes available in the slider for adding courses: Standard Mode and Custom Mode
Standard mode: This is a guided way to add a course, taking you through three different steps: 1. Course slot selection -> 2. Faculty preference -> 3. Lab slot selection (if needed).
Custom mode: This mode allows unrestricted slot selection with no guidance, similar to a free choice. Faculty list and preferences do not apply to courses added through this mode.
Standard Mode
Add Course
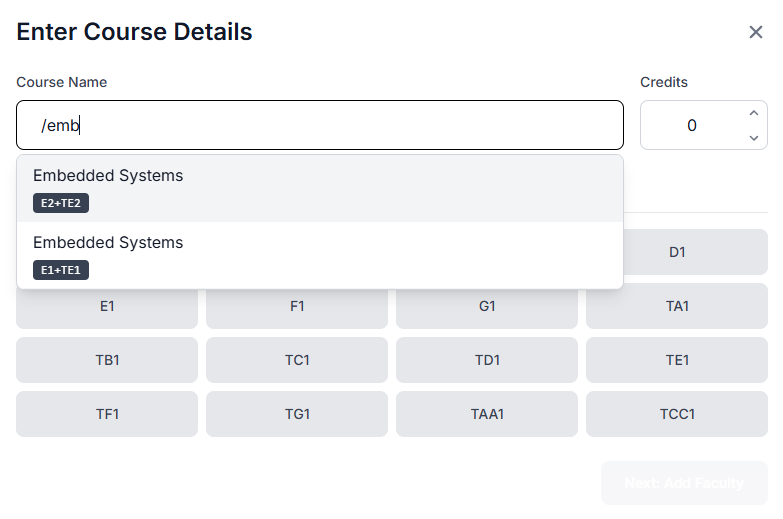
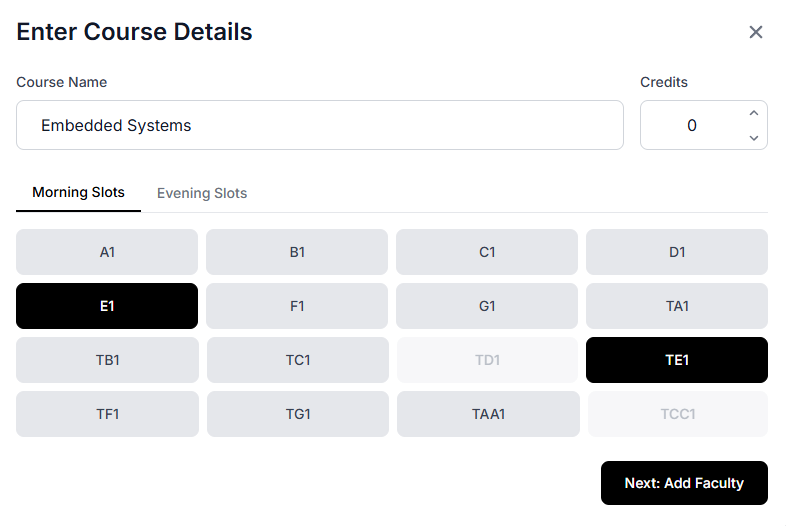
- Click the “Add Course” button in the dashboard to open the course selection modal.
- Course Name: Use “/” to choose from the list of available courses, or start typing the name of the course you want to add without the slash command.
- Slots: Slots will be automatically filled if you use the “/” feature, or you can select them manually.
- Credits: The credits for the course will be automatically filled if you use “/”, or you can use the arrows in the credit input box to enter them manually.
- Click “Next: Add Faculty” to add faculty preferences for the course, which will guide you into the next modal.
Faculty Preference & Priority Selection
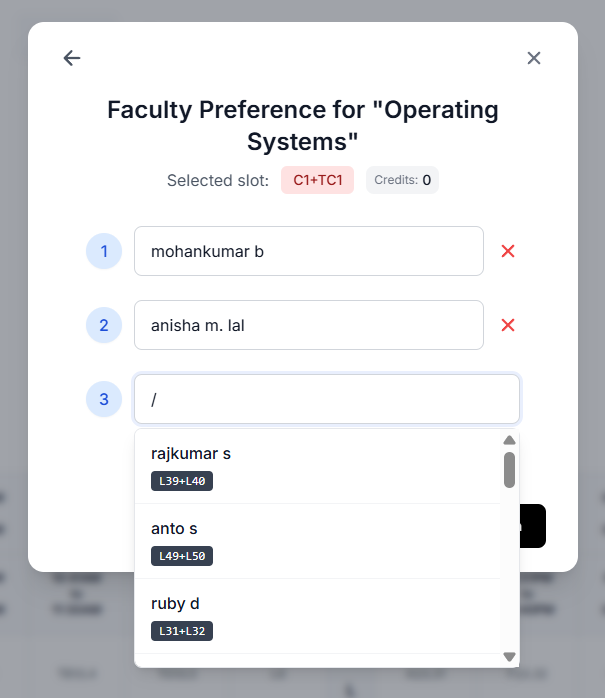
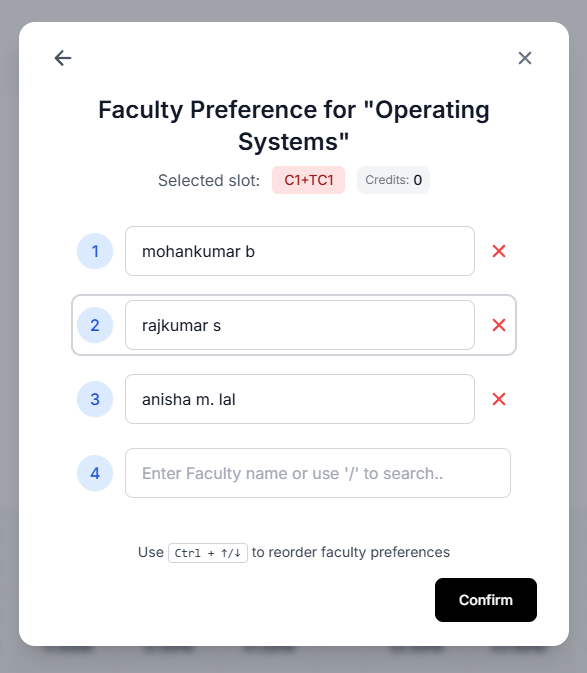
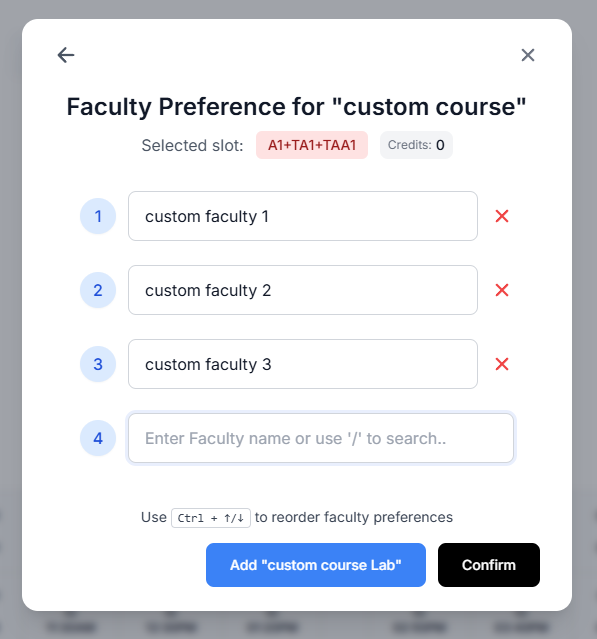
- Use “/” to choose your faculty from the list, or enter the name manually without the slash command. You can add up to 10 faculty members.
- Use Ctrl + Up Arrow/Down Arrow to change the priority order of the selected faculty.
- If your course has a lab component, clicking “Confirm” will take you to the lab slot selection modal.
- There is a conditional flow to the lab slot selection modal based on whether your course has a lab component. If a custom course is entered, the “Add Lab” button will be rendered by default.
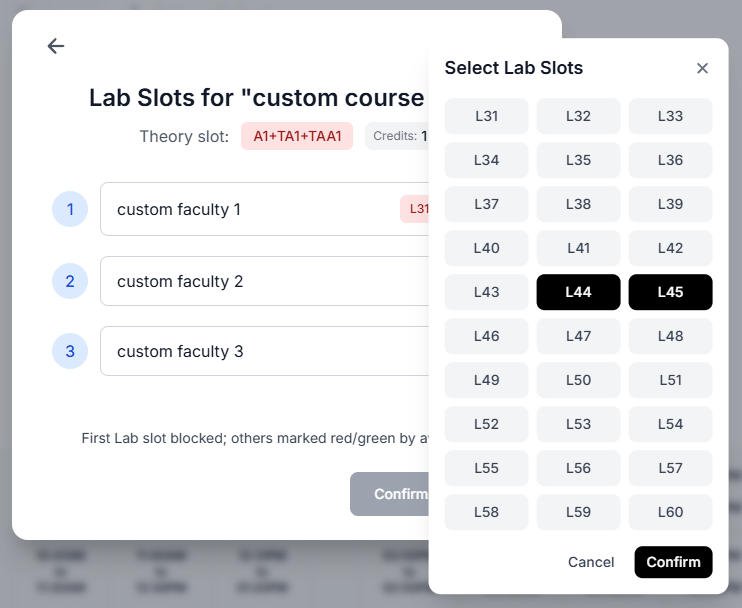
Add Lab Component
Upon confirmation in the faculty preference modal, if the course has a lab component, you will be guided to the lab slot selection modal. If the course and faculty are selected through the “/” command, the lab slots will be filled automatically.
- If you enter the course and faculty manually, click “Add Course” in the faculty preference modal to proceed to the lab slot selection modal.
- Clicking the “+” next to the faculty box will open the slot selector popup, where you can choose your desired lab slots and press “Confirm Details.”
- Alternatively, you can add a lab course through the course card settings by clicking “+ Add Lab.
Custom Mode
You can also add courses by directly clicking on the Time Table cells in the modal
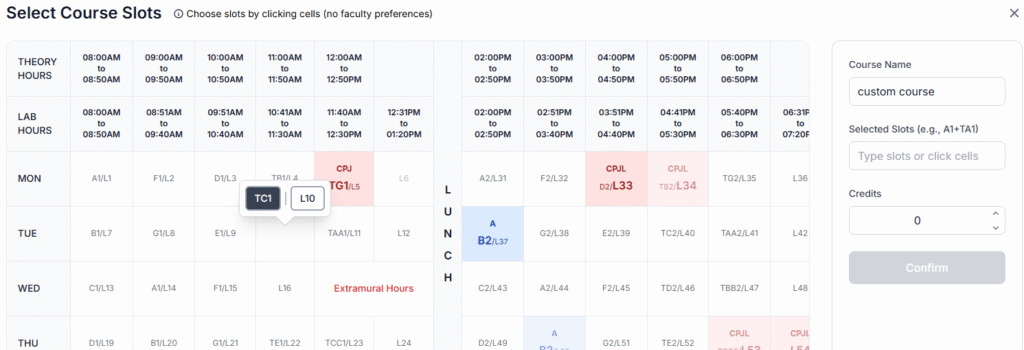
- Click on an empty slot in the timetable and choose your slot from the pop-up.
- Fill in the course details and add it to your plan.
Course Cards
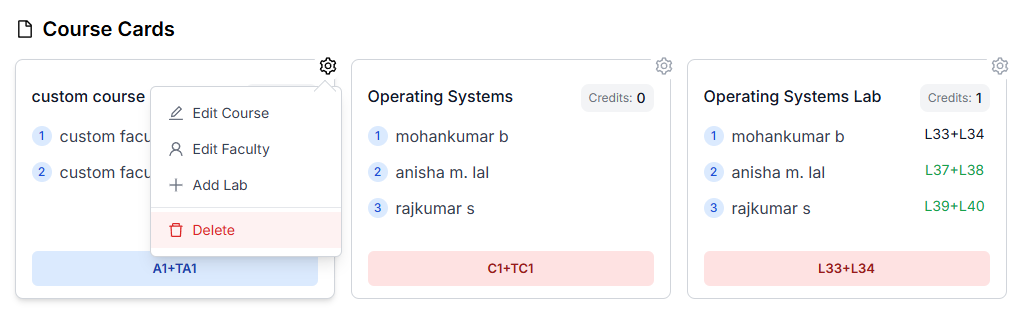
Edit: Add Lab
If a course has a lab component, you can add it separately.
- On the course card of the theory course, click the “+ Add Lab” button.
- Lab Slot Selection modal will open with the available lab slots for that course.
Edit: Course and Faculty Details
You can change the slots of a course you’ve already added.
- On the course card, click on the “Edit Course” or “Edit Faculty”.
- Upon clicking, It will take you to the respective modal to make the edit.
Course Deletion
If you no longer want a course in your plan, you can delete it.
- On the course card, click on the “Delete” icon.
- Confirm the deletion, and the course will be removed from your plan and the timetable.
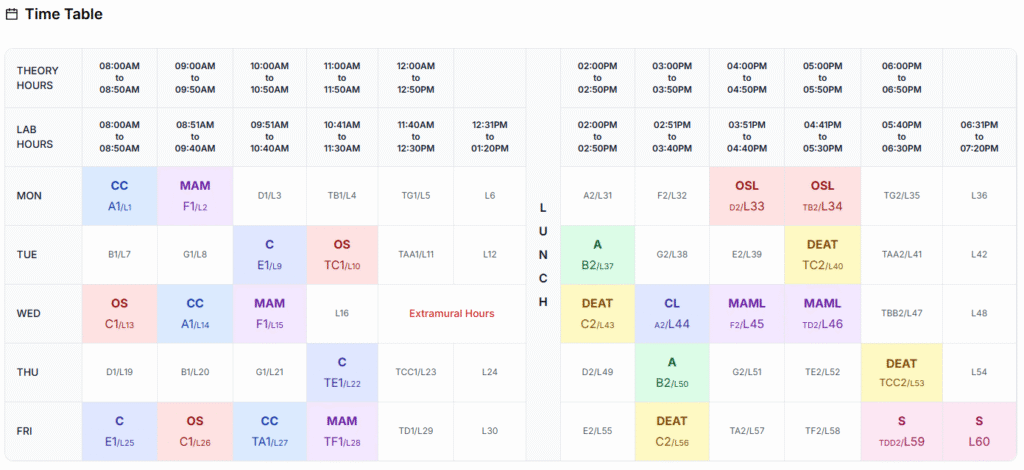
Timetable
The timetable is displayed on the main dashboard. It shows the days of the week and the time slots. As you add courses, the corresponding slots will be filled with the course acronym and color.
Import and Export
You can save your plan and share it with others using the import/export feature.
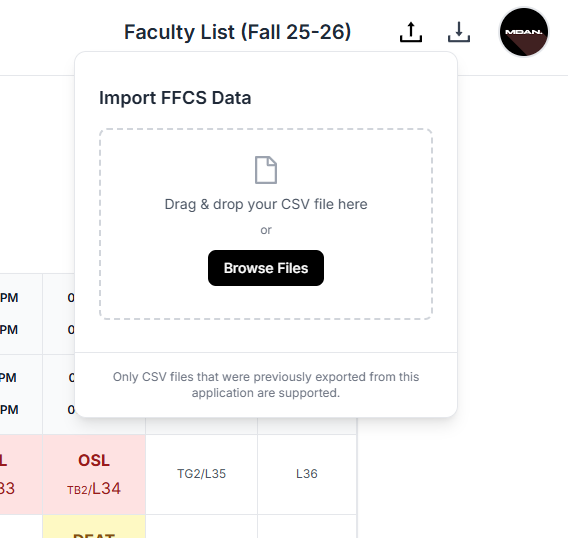
Import
- Click on the “Import” button in the navbar.
- A popover will appear where you can upload a file.
- Drag & Drop or Select a previously exported CSV file from your computer.
- The planner will load the courses and preferences from the file.
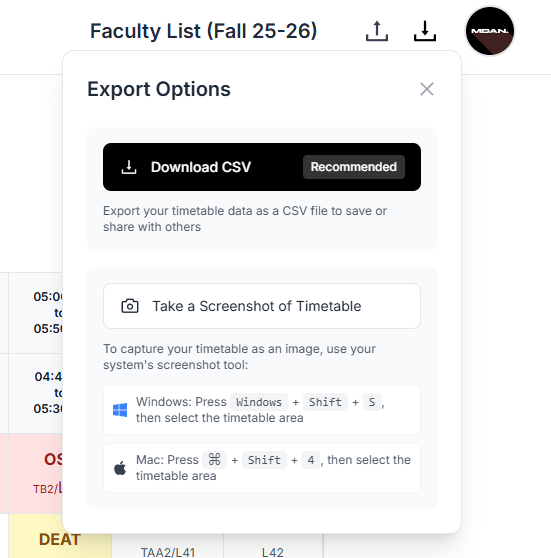
Export
- Click on the “Export” button in the navbar.
- Click “Export” to download the file as CSV.
Customization
Personalize the look of your timetable by choosing .
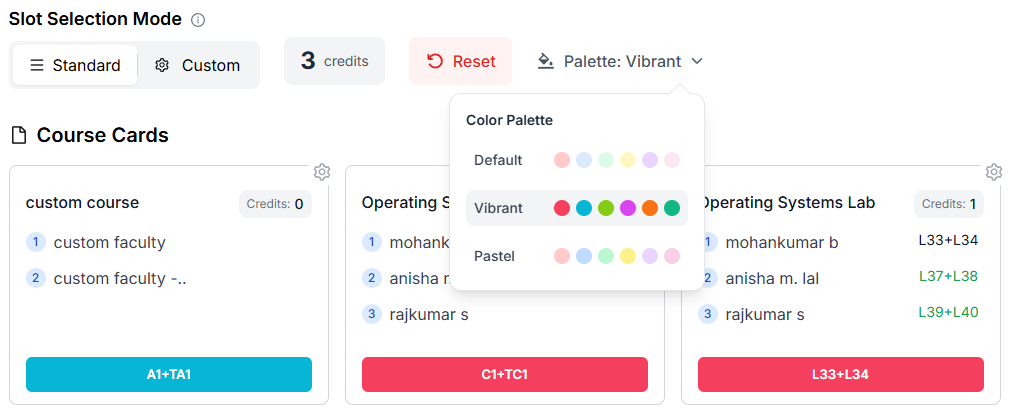
- Find the “Color Palette” dropdown menu on the dashboard.
- Click on it to see the available palettes.
This guide should help you get the most out of the FFCS-Planner. Happy planning!